-
The token has insufficient permissions or scopes.
-
The
target-clientis not specified as the token audience; the token was intended to be used to invokerequester-client. -
The token has too many permissions; therefore, the
requester-clientmay not want to share it with thetarget-client.
Nightly release
This guide is for the unstable nightly release, for the latest release go here.Configuring and using token exchange
Configure and use token exchange for Keycloak.Token exchange is the process that allows a client application to exchange one token for another token. In Keycloak, two features implement token exchange:
-
Standard token exchange: version 2 (V2) - This feature is the fully supported token exchange implementation that is enabled by default once the Keycloak server is started.
-
Legacy token exchange: version 1 (V1) - This preview feature is deprecated and not enabled by default once Keycloak server is started. In future versions legacy Token Exchange will be replaced by version 2, JWT Authorization grant and other features.
The capabilities of Keycloak for token exchange are as follows:
-
A client can exchange an existing Keycloak token created for a specific client for a new token targeted to a different client in the same realm.
-
A client can exchange an existing Keycloak token for an external token, such as a linked Facebook account.
-
A client can exchange an external token for a Keycloak token.
-
A client can impersonate a user.
The standard token exchange supports only use-case (1). The legacy token exchange supports the four use-cases, but it is a preview and deprecated feature. Therefore, the standard token exchange V2 is recommended since it is supported and will be maintained for the future. The legacy token exchange is useful for last three use cases, but it may not be backwards compatible with future Keycloak versions, and it will be finally removed. You can also enable both token exchange features and use them together. For example, you could use both internal-internal exchange provided by V2 together with other use cases that are supported by V1. For more details, see this token exchange comparison.
| If you still need legacy token exchange feature, you also need Fine-grained admin permissions version 1 (FGAP:v1) enabled because Fine-grained admin permissions version 2 (FGAP:v2) does not have support for token exchange permissions. This is on purpose because token-exchange is conceptually not really an "admin" permission and hence there is no plan to add token exchange permissions to FGAP:v2. |
Standard token exchange
Standard token exchange in Keycloak implements the Token exchange specification. It allows client application to exchange an existing Keycloak token created for a specific client for a new token issued to the client that triggered the token exchange request. Both clients must be in the same realm.
Token exchange flow
Consider this typical token exchange flow:
-
The user authenticates with the use of the Keycloak SSO to the client application
initial-client. The token is issued to theinitial-client. -
The client
initial-clientmay need to use the REST servicerequester-client, which requires authentication. So theinitial-clientsends the access token from step 1 to therequester-clientwith the use of the token -
To serve the request, the
requester-clientmay need to call another servicetarget-client. However it may be unable to use the token sent to it frominitial-client. For example:Any of these situations could be the reason to invoke the token exchange. The
requester-clientmay need to send the token exchange request to the Keycloak server and use the original token from step 1 as the subject token and exchange it for another token requested token. -
The requested token is returned to
requester-client. This token can now be sent to thetarget-client. -
The
target-clientcan fulfill the request and return the response to therequester-client. Therequester-clientcan then follow and return the response to the request from step 2.

Figure 1. Token Exchange Example Flow
Many other use-cases exist for token exchange, but the preceding example is the most typical.
Example token exchange request
The following is an example token exchange request of the client requester-client in the realm test. Note that subject_token is the access token issued to the initial-client:
POST /realms/test/protocol/openid-connect/token
Authorization: Basic cmVxdWVzdGVyLWNsaWVudDpwYXNzd29yZA==
Content-Type: application/x-www-form-urlencoded
Accept: application/json

grant_type=urn:ietf:params:oauth:grant-type:token-exchange&
subject_token=$SUBJECT_TOKEN&
subject_token_type=urn:ietf:params:oauth:token-type:access_token&
requested_token_type=urn:ietf:params:oauth:token-type:access_token
The example token exchange response may look like this:
{
  "access_token": "eyJhbGciOiJSUzI1NiIsIn...",
  "expires_in": 300,
  "token_type": "Bearer",
  "issued_token_type": "urn:ietf:params:oauth:token-type:access_token",
  "session_state": "287f3c57-32b8-4c0f-8b00-8c7db231d701",
  "scope": "default-scope1",
  "refresh_expires_in": 0,
  "not-before-policy": 0
}
How to enable token exchange
For standard token exchange, token-exchange-standard:v2 is enabled by default. However, you also need to enable the Standard token exchange switch for
the client that is supposed to send token exchange requests, such as the requester-client from the previous example. Note that requester-client must be a confidential client.
Also, as is the case for other grant requests, the token exchange requests must be authenticated by the appropriate client authentication method that is configured
for the client.
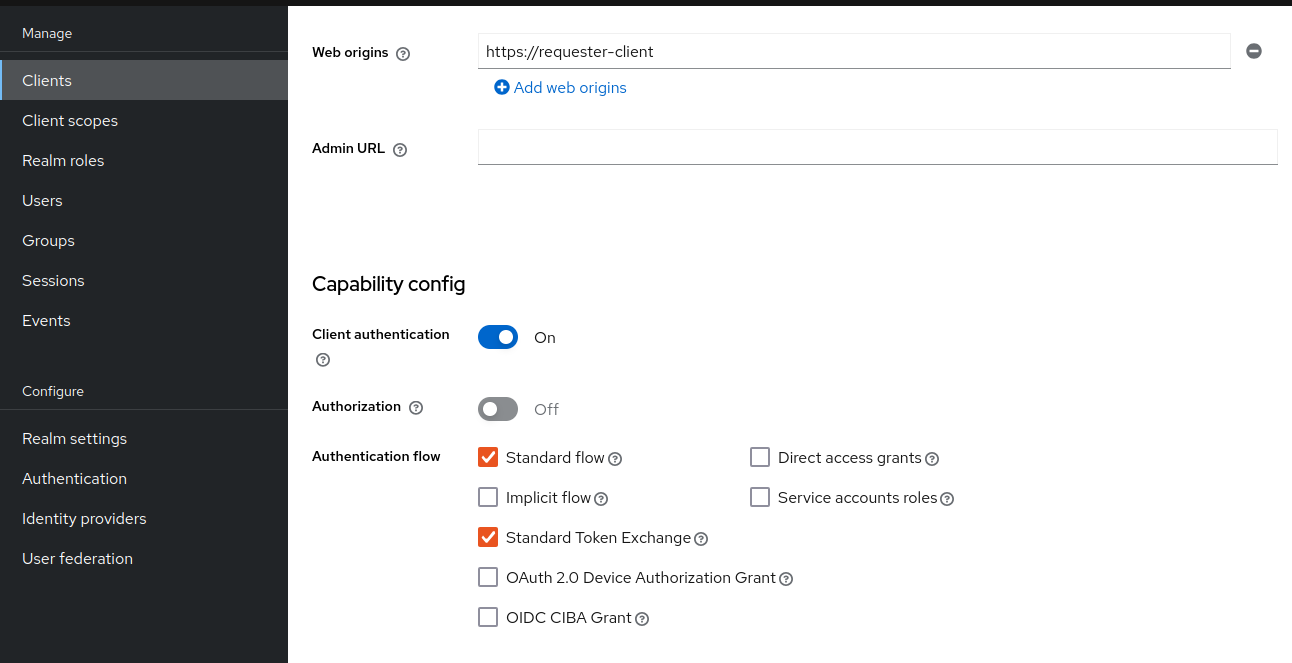
Figure 2. Enabling Token Exchange
Request and response parameters
The parameters are aligned with the Token exchange specification, which are described as follows:
- grant_type
-
REQUIRED. The value of the parameter must be
urn:ietf:params:oauth:grant-type:token-exchange. - subject_token
-
REQUIRED. A security token that represents the identity of the party on behalf of whom the request is being made.
- subject_token_type
-
REQUIRED. This parameter is the type of the token passed in the
subject_tokenparameter. This must beurn:ietf:params:oauth:token-type:access_tokenwhen the standard token exchange is being used because Keycloak does not support other types for the standard token exchange. - requested_token_type
-
OPTIONAL. This parameter represents the type of token that the client wants to exchange for. In this version, only oauth and OpenID Connect token types are supported. The default value for this is
urn:ietf:params:oauth:token-type:access_token. Another possible value isurn:ietf:params:oauth:token-type:id_tokenif the ID token issued torequester-clientis requested. The possible value might be alsourn:ietf:params:oauth:token-type:refresh_token; in this case, you will receive both an access token and refresh token within the response. However, the refresh token is allowed if theAllow refresh token in Standard Token Exchangeclient configuration option is enabled as specified in the standard token exchange section. - scope
-
OPTIONAL. This parameter represents the space-delimited set of OAuth and OpenID Connect scopes that the client is requesting. You can use Optional client scopes of the
requester-client. For more details, see scopes and audiences. Omitting this parameter means that only the Default client scopes are effectively used. - audience
-
OPTIONAL. Audience specifies
client_idof the client, which is supposed to be used as the token audience. In the example above, it could betarget-client. Multiple values of this parameter are allowed, which means that you want the token to contain multiple audiences to be used byrequester-clientin multiple different services. For exampleaudience=target-client1&audience=target-client2can be used in the request. More details in the section about scopes and audiences.
A successful response is returned in the JSON format. It contains similar parameters such as the response from other grants. The following are some token exchange specifics of the more notable parameters:
- access_token
-
The requested access token. Note that if request specified
requested_token_type=urn:ietf:params:oauth:token-type:id_token, this parameter may actually contain the ID token instead of access token. This behavior is per the token exchange specification. - refresh_token
-
The refresh token. It is included just if
requested_token_type=urn:ietf:params:oauth:token-type:refresh_tokenis used and the client has enabled issuing refresh tokens from the token exchange - issued_token_type
-
The issued requested token type. Same value as
requested_token_typeused in the request. - token_type
-
Usually
Bearerif issued token type was access token or refresh token. In case of ID token requested, the value isN_A
Scopes and audiences
The scope parameter in the token exchange request has the same meaning as other grants. This parameter is optional. When it is omitted, the effective client scopes used in the request are
the Default client scopes of the requester-client. When this parameter is used, the effective client scopes are the default scopes together with
the Optional client scopes
By default, the used client scopes will add the audiences to the aud claim of the token based on the used client scopes and client roles as specified in the Audience documentation.
The audience parameter can be used for filtering of audiences, so that the aud claim will contain only the audiences specified by the audience parameter. Similarly the client roles in the token will
be filtered and the token will have only the client roles of the clients specified by the audience parameter.
In addition, the audience parameter can be used to potentially filter client scopes as well. It works in a manner that is similar to Client scope permission for users.
If the client scope does not contain any client roles (for example, it contains zero roles or it contains only realm roles), no additional filtering occurs for client scopes. However, if the client scope contains any
client role mappings, it must include some client roles of the clients requested by the audience parameter. Composite roles are also included for consideration. If the client scope contains no client
roles of the clients requested by the audience, the client scope will be filtered.
The audience parameter can be used to filter the audiences that are coming from the used client scopes. However, this parameter will not add more audiences. When the audience parameter is omitted,
no filtering occurs. As a result, the audience parameter is effectively used for "downscoping" the token to make sure that it contains only the requested audiences. However, the scope parameter is used
to add optional client scopes and hence it can be used for "upscoping" and adding more scopes.
|
By default, token exchange can be used to request extra scopes and audiences that are not present in the initial subject_token. If, for security reasons, you want to ensure that scopes are limited to the ones already granted to the subject_token, the downscope-assertion-grant-enforcer policy executor can be applied to the client. This executor enforces that only downscoping is allowed for token exchange. See Downscoping and Client Policies chapters in the Server Administration Guide for more information.
|
Examples
Here are some examples to better illustrate the behavior for scopes and audiences.
Assume we have the realm with:
-
Client
target-client1with the client roletarget-client1-role -
Client
target-client2with the client roletarget-client2-role -
Client
target-client3with the client roletarget-client3-role -
Client scope
default-scope1. This client scope has role scope mapping for the client roletarget-client1/target-client1-role -
Client scope
optional-scope2. This client scope has role scope mapping for the client roletarget-client2/target-client2-role -
Client
requester-client, which has client scopedefault-scope1added as default client scope and scopeoptional-scope2added as an optional client scope -
Authenticated user, who is member of both
target-client1-roleandtarget-client2-role
The settings above means that using scope default-scope1 will add the audience target-client1 to the token and using optional-scope2 will add the audience target-client2. This is because of the
audience resolving described in the Audience documentation.
Example 1
Token exchange request sent with scope=optional-scope2 and without audience parameter:
There will be no filtering of audience. The scopes and audiences will be resolved as is the case for any other grants as described in the Client scopes and Audience documentation sections. The response token will be similar to this (claims not interesting for this example omitted for brevity):
{
  "azp": "requester-client",
  "scope": "default-scope1 optional-scope2",
  "aud": [ "target-client1", "target-client2" ],
  "resource_access": {
	"target-client1": {
  	  "roles": [ "target-client1-role" ]
	},
	"target-client2": {
  	  "roles": [ "target-client2-role" ]
	}
  },
  ...
}
Example 2
Token exchange request sent with scope=optional-scope2 and with audience=target-client2
Same like previous example, but target-client1 audience and client roles filtered due audience parameter was included, but only with this target-client2 client. The client scope default-scope1 will be
also filtered because it contains some client roles but no client roles of the requested audience client target-client2. So the token would be as follows:
{
  "azp": "requester-client",
  "scope": "optional-scope2",
  "aud": [ "target-client2" ],
  "resource_access": {
    "target-client2": {
      "roles": [ "target-client2-role" ]
    }
  },
  ...
}
Example 3
Token exchange request sent with scope=optional-scope2 and with audience=target-client2&audience=target-client3
The target-client3 is not part of the token audience as user does not have any roles. So in this case, the request will be rejected as some of the requested audiences are not available.
| As mentioned in the token exchange specification, it is good practice to downscope the token as much as possible and use only the audiences needed. Ideally use a single audience. This strategy increases the probability that request will be allowed. |
| If you have a more complex deployment with many various scopes and audiences, it can be challenging to model it in an appropriate way. Consider using the Client scopes evaluate tab to test if the token looks as expected for the given user and for the given set of scopes and audiences. |
Token exchange - Additional details
These additional points clarify the behavior of token exchange.
-
It is not supported for public clients to send the token exchange requests. Token exchange V1 includes very limited support for public clients, allowing public clients to exchange the token to itself with fewer scopes. This use case can be replaced by refresh token grant.
-
The
subject_tokensent to the token exchange endpoint must have the requester client set as an audience in theaudclaim. Otherwise, the request would be rejected. The only exception is, if client exchanges his own token, which was issued to it. Exchanging to itself might be useful to downscope/upscope the token or filter unneeded token audiences and so on. -
Sender-constrained tokens (as defined in RFC 7800) cannot be used as
subject_token. This includes DPoP-bound tokens and X.509 certificate-bound tokens. Standard Token Exchange only accepts Bearer access tokens as subject tokens. If you provide a sender-constrained token, the request will be rejected with aninvalid_requesterror. However, you can obtain DPoP-bound tokens as output from token exchange by including a valid DPoP proof in the request. For more details, see Securing applications with Demonstrating Proof-of-Possession (DPoP). -
Consents - If the requester client has Consent required enabled, the token exchange is allowed only if the user is already granted consent to all requested scopes
-
Fine-grained admin permissions (FGAP) are not needed for the standard token exchange. We plan to eventually integrate with FGAP for the future, but that integration might be available to all grants. It will not be specific only to token exchange as it was in token exchange V1.
-
Integrating token exchange with Client policies is possible. This integration can be useful to address certain use cases. For example, consider the use case to reject the token exchange request if the client
requester-clientsends the request withscope=some-confidential-scope. In this example, it can be useful to create a client policy condition with combined conditions forclient-scope,grant-typeandclient-roles. -
Requesting a refresh token is allowed only if the client has the switch Allow refresh token in Standard Token Exchange set to a value other than
No(the default value). The switch is available in the Admin Console in the Advanced tab of the OIDC client in the OpenID Connect Compatibility Modes section. The other available value of the switch is Same session, which means that the refresh token is allowed only if the refresh token can use the same user session as the subject token. If that subject token is coming from a Transient session or from an Offline session, the requesting refresh token will not be allowed. Similarly it will not be allowed to request an offline token (usingscope=offline_access).
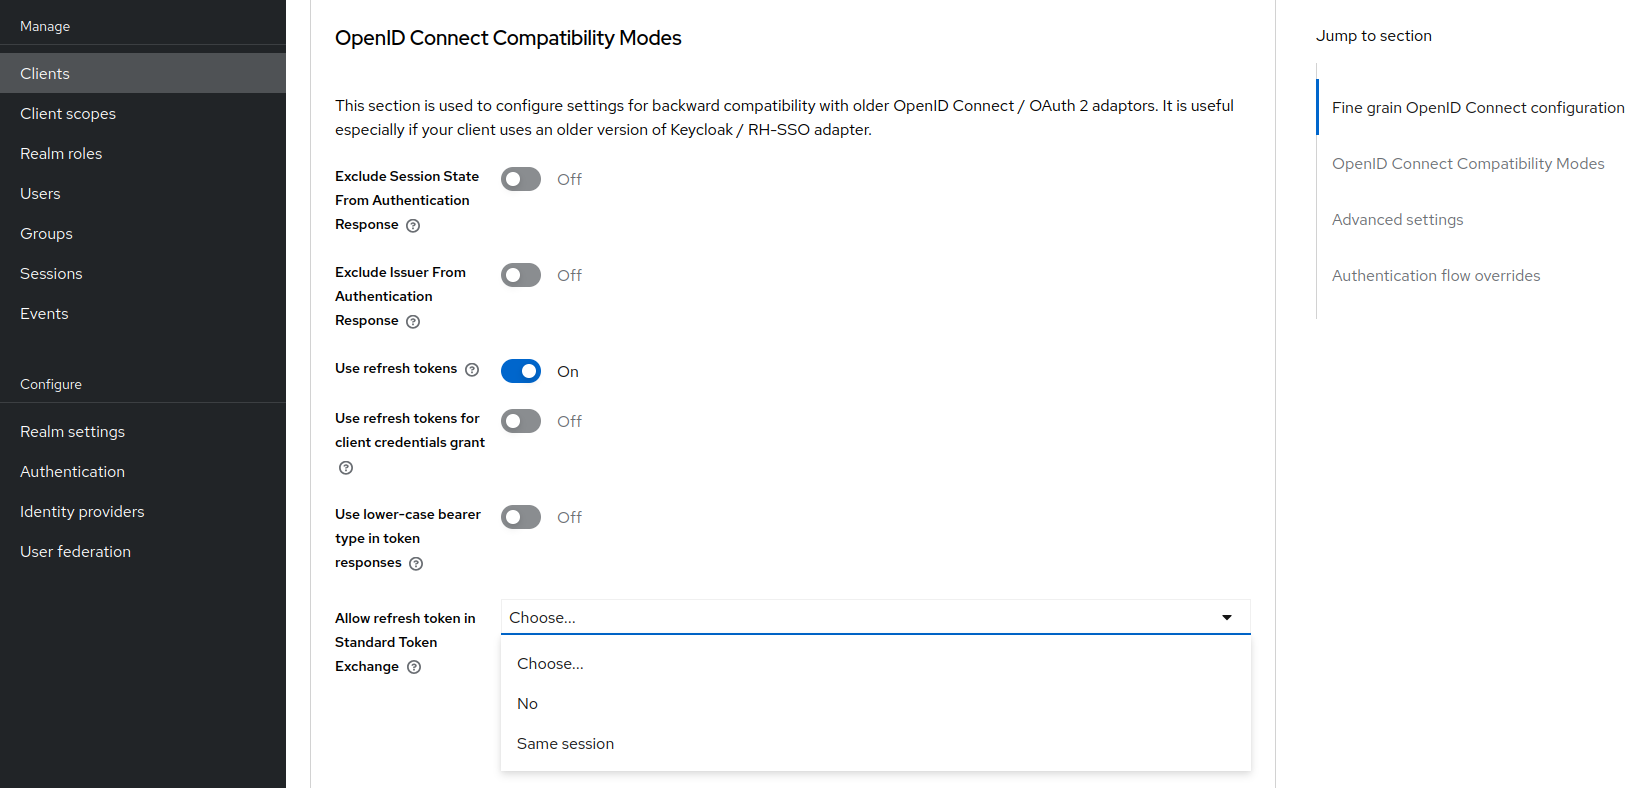
Figure 3. Enabling refresh token in Token Exchange
-
Token exchange never creates a new user session. In case that
requested_token_typeis a refresh token, it may eventually create a new client session in the user session for the requester client (if the client session was not yet created). -
Keycloak Token exchange does not yet have support for the
resourceparameter. -
The token exchange specification mentions the concepts of impersonation and delegation. Keycloak has support for the impersonation use case, but not yet for the delegation use case.
Revocation
Assuming that there is a subject token access-token1 issued to the client initial-client, here are some considerations related to token revocation:
-
For the case when the
access-token1was exchanged to theaccess-token2of the clientrequester-client, the revocation of theaccess-token1will not revokeaccess-token2. Supporting of a "revocation chain" for access tokens would mean quite an overhead. So considering this, the administrator must ensure that access tokens are short-lived and are revoked automatically after some time. -
For the case when
access-token1was exchanged torefresh-token2of clientrequester-client, we try to support revocation chain. This means that:-
Revocation of
access-token1will revoke alsorefresh-token2. Moreover this will remove the client session of the clientrequester-clientfrom the user session and hence all refresh tokens ofrequester-clientin this user session will be effectively revoked -
In case that
refresh-token2and it’s related access token was used for the further token exchange to different client, then revocation ofaccess-token1will revoke those subsequent token exchanges as well. In other words, the whole "chain" of exchanged tokens is going to be revoked. -
Note that the access token should be valid when the revocation endpoint is invoked. If you do not have a valid access token when the original
access-token1has expired, you can potentially use another access token issued to same client in the same user session. The exchanged tokens such asrefresh-token2and others from the "chain" should be revoked.
-
Comparison of standard token exchange and legacy token exchange
While the preceding sections fully detail standard and legacy token exchange, the following is an overall summary that compares the two token exchange methods.
| Capability | Standard token exchange V2 | Legacy token exchange V1 |
|---|---|---|
Internal-internal token exchange |
Supported. Implemented as per RFC 8693 |
Preview support. Loose implementation of RFC 8693. It is recommended to use V2 instead |
Allowed |
Access token type only |
Access token type only for internal-internal, JWT for external-internal scenarios |
Allowed |
Access token (default), Refresh token, ID token |
Access token, Refresh token (default), SAML 2.0 assertion |
Behavior of |
Aligned with other grants. Scope parameter means requesting optional scopes of the client, which sent the token exchange request |
Scope parameter based on the scopes of the "target" client specified by audience parameter. Downscoping support only |
Behavior of |
Support for more values as per the specification. It can be used to narrow down the available audiences and keep only the requested audiences. Effectively downscoping the token per the required target audience |
Support for single audience value. Token effectively issued to the client requested by the audience parameter and using the scopes of that client |
Public clients |
Not available. Downscoping implemented by V1 can be replaced by refresh token grant |
Available only to exchange token of the client itself. Effectively downscoping support only |
Consents |
Allowed for clients with |
Not allowed for clients with Consent required |
Authorization |
Verification that the requester client must be in the audience of the |
Based on fine-grained admin permissions version 1 |
Revocation chain |
Not available for access tokens. Available for refresh tokens |
Not available for access nor refresh tokens |
Delegation per RFC 8693 |
Not supported yet |
Not supported |
Resource parameter per RFC 8693 |
Not supported yet |
Not supported |
Internal to external Token Exchange |
Identity brokering APIs can be used instead. See Identity Brokering APIs for more information. |
Implemented as a preview |
External to internal Token Exchange |
Use-case implemented by Standard Token Exchange V2 and JWT Authorization Grant. See OAuth Identity and Authorization Chaining Across Domains for more information. |
Implemented as a preview |
Subject impersonation (including direct naked impersonation) |
Not implemented yet |
Implemented as a preview |
Legacy token exchange
|
Token Exchange Service is Preview and Deprecated. This feature is not fully supported, disabled by default, and will be removed in future versions. To enable start the server with |
|
If you still need legacy token exchange feature, you also need Fine-grained admin permissions version 1 (FGAP:v1) enabled because Fine-grained admin permissions version 2 (FGAP:v2) does not have support for token exchange permissions. This is on purpose because token-exchange is conceptually not really an "admin" permission and hence there is no plan to add token exchange permissions to FGAP:v2. For details, see the Enabling and disabling features guide. |
How token exchange works
In Keycloak, token exchange is the process of using a set of credentials or token to obtain an entirely different token. A client may want to invoke on a less trusted application so it may want to downgrade the current token it has. A client may want to exchange a Keycloak token for a token stored for a linked social provider account. You may want to trust external tokens minted by other Keycloak realms or foreign IDPs. A client may have a need to impersonate a user. Here’s a short summary of the current capabilities of Keycloak around token exchange.
-
A client can exchange an existing Keycloak token created for a specific client for a new token targeted to a different client
-
A client can exchange an existing Keycloak token for an external token, i.e. a linked Facebook account
-
A client can exchange an external token for a Keycloak token.
-
A client can impersonate a user
Token exchange in Keycloak is a very loose implementation of the OAuth Token Exchange specification at the IETF. We have extended it a little, ignored some of it, and loosely interpreted other parts of the specification. It is a simple grant type invocation on a realm’s OpenID Connect token endpoint.
/realms/{realm-name}/protocol/openid-connect/tokenIt accepts form parameters (application/x-www-form-urlencoded) as input and the output depends on the type of token you requested an exchange for.
Token exchange is a client endpoint so requests must provide authentication information for the calling client.
Public clients specify their client identifier as a form parameter. Confidential clients can also use form parameters
to pass their client id and secret, Basic Auth, or however your admin has configured the client authentication flow in your
realm.
Form parameters
- client_id
-
REQUIRED MAYBE. This parameter is required for clients using form parameters for authentication. If you are using Basic Auth, a client JWT token, or client cert authentication, then do not specify this parameter.
- client_secret
-
REQUIRED MAYBE. This parameter is required for clients using form parameters for authentication and using a client secret as a credential. Do not specify this parameter if client invocations in your realm are authenticated by a different means.
- grant_type
-
REQUIRED. The value of the parameter must be
urn:ietf:params:oauth:grant-type:token-exchange. - subject_token
-
OPTIONAL. A security token that represents the identity of the party on behalf of whom the request is being made. It is required if you are exchanging an existing token for a new one.
- subject_issuer
-
OPTIONAL. Identifies the issuer of the
subject_token. It can be left blank if the token comes from the current realm or if the issuer can be determined from thesubject_token_type. Otherwise it is required to be specified. Valid values are the alias of anIdentity Providerconfigured for your realm. Or an issuer claim identifier configured by a specificIdentity Provider. - subject_token_type
-
OPTIONAL. This parameter is the type of the token passed with the
subject_tokenparameter. This defaults tourn:ietf:params:oauth:token-type:access_tokenif thesubject_tokencomes from the realm and is an access token. If it is an external token, this parameter may or may not have to be specified depending on the requirements of thesubject_issuer. - requested_token_type
-
OPTIONAL. This parameter represents the type of token the client wants to exchange for. Currently only oauth and OpenID Connect token types are supported. The default value for this depends on whether it is
urn:ietf:params:oauth:token-type:refresh_tokenin which case you will be returned both an access token and refresh token within the response. Other appropriate values areurn:ietf:params:oauth:token-type:access_tokenandurn:ietf:params:oauth:token-type:id_token - audience
-
OPTIONAL. This parameter specifies the target client you want the new token minted for.
- requested_issuer
-
OPTIONAL. This parameter specifies that the client wants a token minted by an external provider. It must be the alias of an
Identity Providerconfigured within the realm. - requested_subject
-
OPTIONAL. This specifies a username or user id if your client wants to impersonate a different user.
- scope
-
OPTIONAL. This parameter represents the target set of OAuth and OpenID Connect scopes the client is requesting. Returned scope is the Cartesian product of scope parameter and access token scope.
| We currently only support OpenID Connect and OAuth exchanges. Support for SAML based clients and identity providers may be added in the future depending on user demand. |
Responses from a token exchange request
A successful response from an exchange invocation will return the HTTP 200 response code with a content type that
depends on the requested-token-type and requested_issuer the client asks for. OAuth requested token types will return
a JSON document as described in the OAuth Token Exchange specification.
{
   "access_token" : ".....",
   "refresh_token" : ".....",
   "expires_in" : "...."
 }
Clients requesting a refresh token will get back both an access and refresh token in the response. Clients requesting only
access token type will only get an access token in the response. Expiration information may or may not be included for
clients requesting an external issuer through the requested_issuer parameter.
Error responses generally fall under the 400 HTTP response code category, but other error status codes may be returned
depending on the severity of the error. Error responses may include content depending on the requested_issuer.
OAuth based exchanges may return a JSON document as follows:
{
   "error" : "...."
   "error_description" : "...."
}
Additional error claims may be returned depending on the exchange type. For example, OAuth Identity Providers may include
an additional account-link-url claim if the user does not have a link to an identity provider. This link can be used
for a client initiated link request.
| Token exchange setup requires knowledge of fine grain admin permissions (See the Server Administration Guide for more information). You will need to grant clients permission to exchange. This is discussed more later in this chapter. |
The rest of this chapter discusses the setup requirements and provides examples for different exchange scenarios. For simplicity’s sake, let’s call a token minted by the current realm as an internal token and a token minted by an external realm or identity provider as an external token.
Internal token to internal token exchange
| For internal token to internal token exchange, it is recommended to use Standard token exchange instead of using the legacy token exchange flow described below. Standard token exchange is officially supported. |
With an internal token to token exchange you have an existing token minted to a specific client and you want to exchange this token for a new one minted for a different target client. Why would you want to do this? This generally happens when a client has a token minted for itself, and needs to make additional requests to other applications that require different claims and permissions within the access token. Other reasons this type of exchange might be required is if you need to perform a "permission downgrade" where your app needs to invoke on a less trusted app and you don’t want to propagate your current access token.
Granting permission for the exchange
Clients that want to exchange tokens for a different client need to be authorized in the Admin Console.
You need to define a token-exchange fine grain permission in the target client you want permission to exchange to.
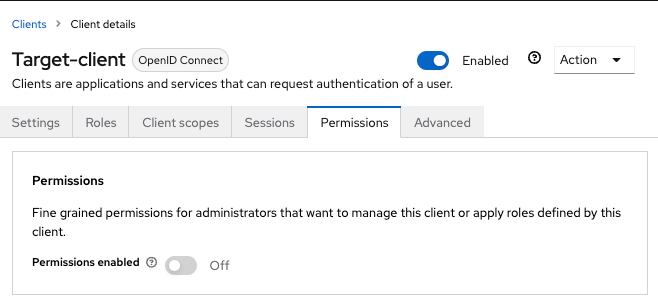
Figure 4. Target Client Permission
Procedure
-
Toggle Permissions Enabled to On.
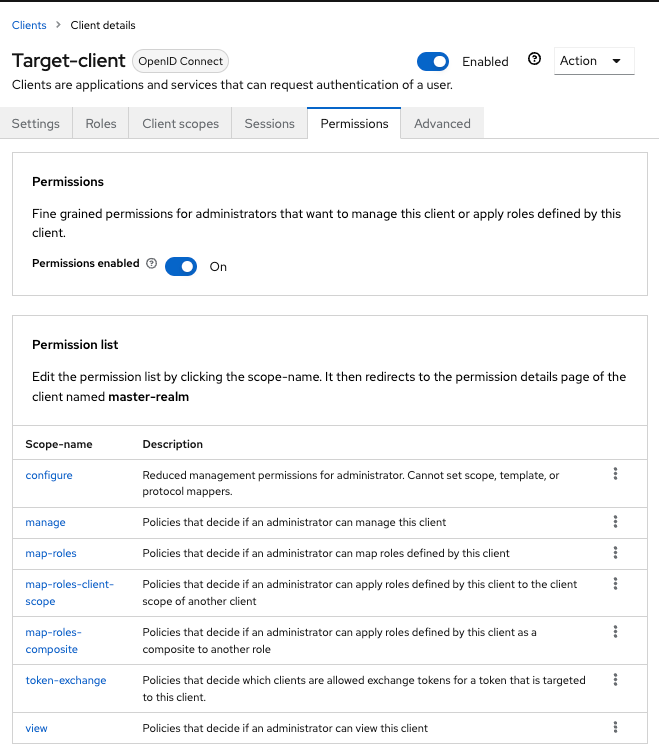 Figure 5. Target Client Permission
That page displays a token-exchange link.
-
Click that link to start defining the permission.
This setup page displays.
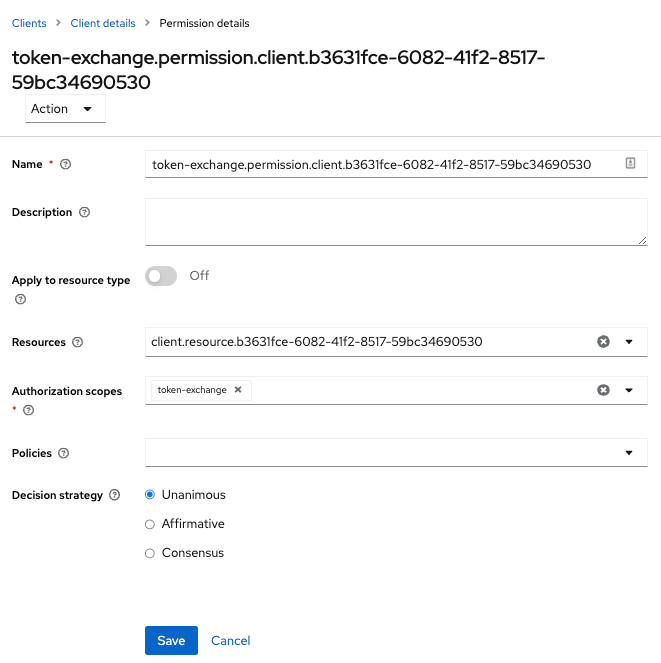 Figure 6. Target Client Exchange Permission Setup
 -
Click Client details in the breadcrumbs at the top of the screen.
-
Define a policy for this permission.
-
Click Authorization in the breadcrumbs at the top of the screen.
-
Define a policy for this permission.
-
Click the Policies tab.
-
Create a Client Policy by clicking Create policy button.
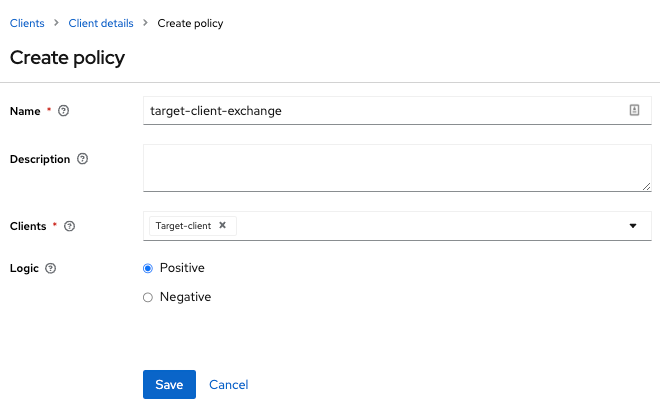 Figure 7. Client Policy Creation
 -
Enter in the starting client that is the authenticated client that is requesting a token exchange.
-
After you create this policy, go back to the target client’s token-exchange permission and add the client policy you just defined.
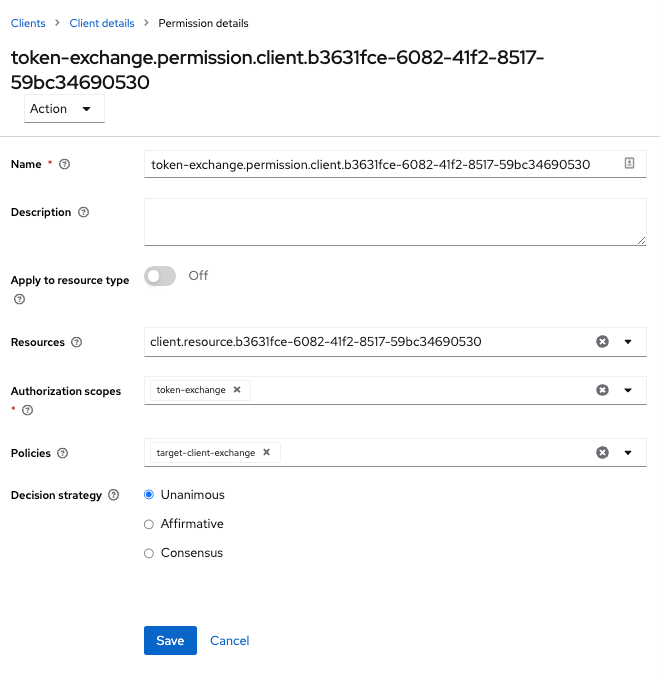 Figure 8. Apply Client Policy
Your client now has permission to invoke. If you do not do this correctly, you will get a 403 Forbidden response if you try to make an exchange.
Making the request
When your client is exchanging an existing token for a token targeting another client, you use the audience parameter.
This parameter must be the client identifier for the target client that you configured in the Admin Console.
curl -X POST \
    -d "client_id=starting-client" \
    -d "client_secret=the client secret" \
    --data-urlencode "grant_type=urn:ietf:params:oauth:grant-type:token-exchange" \
    -d "subject_token=...." \
    --data-urlencode "requested_token_type=urn:ietf:params:oauth:token-type:refresh_token" \
    -d "audience=target-client" \
    http://localhost:8080/realms/myrealm/protocol/openid-connect/token
The subject_token parameter must be an access token for the target realm. If your requested_token_type parameter
is a refresh token type, then the response will contain both an access token, refresh token, and expiration. Here’s
an example JSON response you get back from this call.
When the audience parameter is not set, the value of the parameter defaults to the client making the token exchange request.
Unlike with confidential clients, public clients are not allowed to perform token exchanges using tokens from other clients.
If you are passing a subject_token, the (confidential) client that was issued the token should either match the client making the request or, if issued to a different client,
the client making the request should be among the audiences set to the token.
If you are explicitly setting a target audience (with a client different from the client making the request), you should also make sure that the token-exchange scope permission is configured for the client set to the audience parameter to allow
the client making the request to successfully complete the exchange.
{
   "access_token" : "....",
   "refresh_token" : "....",
   "expires_in" : 3600
}
Internal token to external token exchange
| For internal token to external token exchange, it is recommended to use Identity Brokering APIs instead. The legacy Token Exchange V1 is deprecated and will be removed in future versions. |
You can exchange a realm token for an external token minted by an external identity provider. This external identity provider
must be configured within the Identity Provider section of the Admin Console. Currently only OAuth/OpenID Connect based external
identity providers are supported, this includes all social providers. Keycloak does not perform a backchannel exchange to the external provider. So if the account
is not linked, you will not be able to get the external token. To be able to obtain an external token one of
these conditions must be met:
-
The user must have logged in with the external identity provider at least once
-
The user must have linked with the external identity provider through the User Account Service
-
The user account was linked through the external identity provider using Client Initiated Account Linking API.
Finally, the external identity provider must have been configured to store tokens, or one of the above actions must have been performed with the same user session as the internal token you are exchanging.
If the account is not linked, the exchange response will contain a link you can use to establish it. This is discussed more in the Making the Request section.
Granting permission for the exchange
Internal to external token exchange requests will be denied with a 403, Forbidden response until you grant permission for the calling client to exchange tokens with the external identity provider. To grant permission to the client, you go to the identity provider’s configuration page to the Permissions tab.
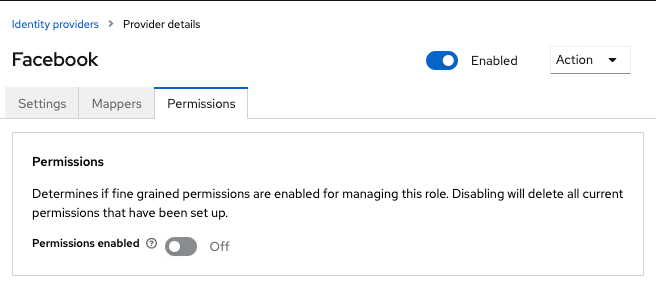
Figure 9. Identity Provider Permission
Procedure
-
Toggle Permissions Enabled to On.
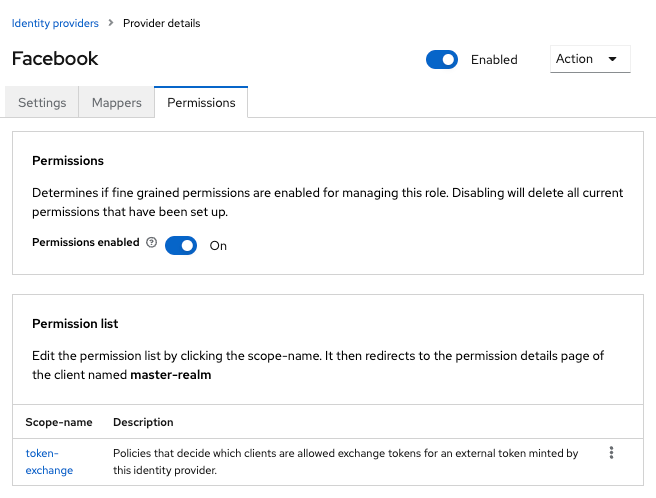 Figure 10. Identity Provider Permission
The page displays token-exchange link.
-
Click the link to start defining the permission.
This setup page appears.
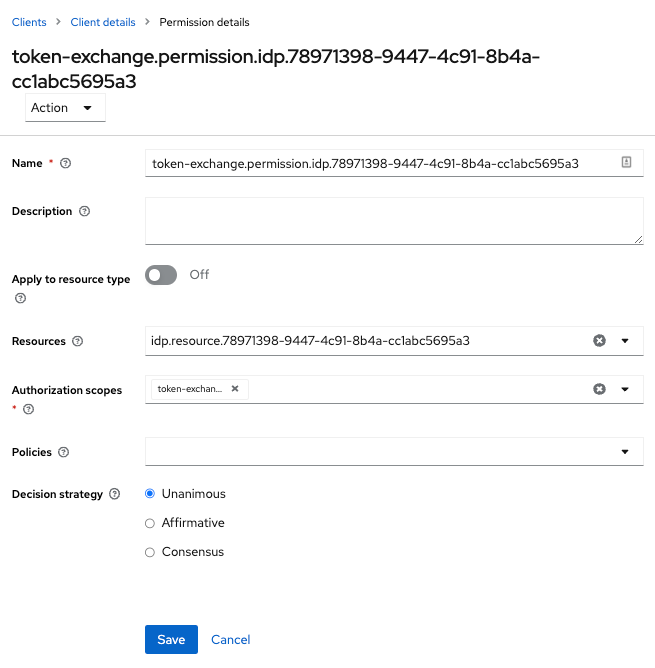 Figure 11. Identity Provider Exchange Permission Setup
 -
Click Client details in the breadcrumbs at the top of the screen.
-
Click Policies tab to create a client policy.
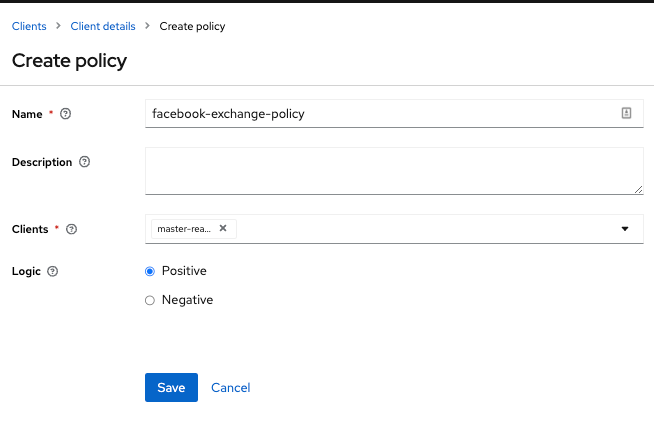 Figure 12. Client Policy Creation
 -
Enter the starting client that is the authenticated client that is requesting a token exchange.
-
Return to the identity provider’s token-exchange permission and add the client policy you just defined.
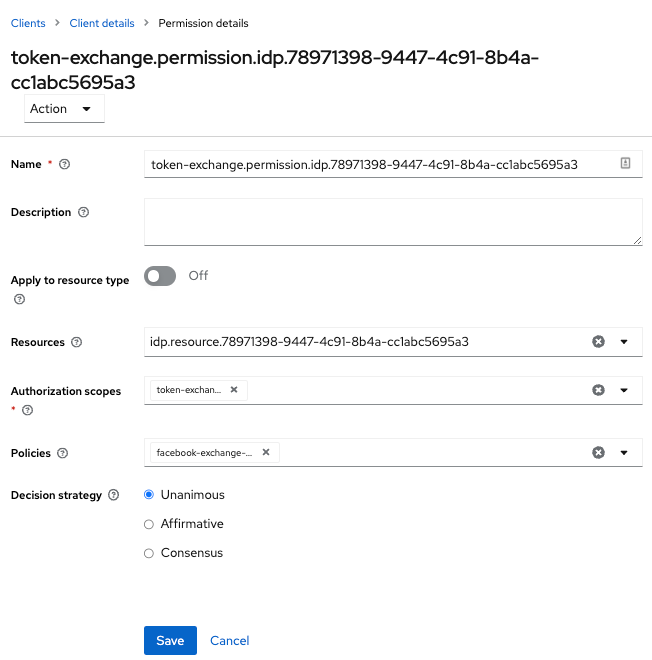 Figure 13. Apply Client Policy
Your client now has permission to invoke. If you do not do this correctly, you will get a 403 Forbidden response if you try to make an exchange.
Making the request
When your client is exchanging an existing internal token to an external one, you provide the requested_issuer parameter. The parameter must be the alias of a configured identity provider.
curl -X POST \
    -d "client_id=starting-client" \
    -d "client_secret=the client secret" \
    --data-urlencode "grant_type=urn:ietf:params:oauth:grant-type:token-exchange" \
    -d "subject_token=...." \
    --data-urlencode "requested_token_type=urn:ietf:params:oauth:token-type:access_token" \
    -d "requested_issuer=google" \
    http://localhost:8080/realms/myrealm/protocol/openid-connect/token
The subject_token parameter must be an access token for the target realm. The requested_token_type parameter
must be urn:ietf:params:oauth:token-type:access_token or left blank. No other requested token type is supported
at this time. Here’s
an example of a successful JSON response you get back from this call.
{
   "access_token" : "....",
   "expires_in" : 3600
   "account-link-url" : "https://...."
}
If the external identity provider is not linked for whatever reason, you will get an HTTP 400 response code with this JSON document:
{
   "error" : "....",
   "error_description" : "..."
   "account-link-url" : "https://...."
}
The error claim will be either token_expired or not_linked. The account-link-url claim is provided
so that the client can perform Client Initiated Account Linking. Most, if not all,
providers require linking through browser OAuth protocol. With the account-link-url just add a redirect_uri
query parameter to it and you can forward browsers to perform the link.
External token to internal token exchange
You can trust and exchange external tokens minted by external identity providers for internal tokens. This can be used to bridge between realms or just to trust tokens from your social provider. It works similarly to an identity provider browser login in that a new user is imported into your realm if it doesn’t exist.
| The current limitation on external token exchanges is that if the external token maps to an existing user an exchange will not be allowed unless the existing user already has an account link to the external identity provider. |
When the exchange is complete, a user session will be created within the realm, and you will receive an access
and or refresh token depending on the requested_token_type parameter value. You should note that this new
user session will remain active until it times out or until you call the logout endpoint of the realm passing this
new access token.
These types of changes required a configured identity provider in the Admin Console.
| SAML identity providers are not supported at this time. Twitter tokens cannot be exchanged either. |
| A combination of Standard Token Exchange V2 and JWT Authorization Grant is recommended instead of the legacy external to internal Token Exchange. See OAuth Identity and Authorization Chaining Across Domains for more information about how those two supported features can be used to substitute the legacy Token Exchange. |
Granting permission for the exchange
Before external token exchanges can be done, you grant permission for the calling client to make the exchange. This permission is granted in the same manner as internal to external permission is granted.
If you also provide an audience parameter whose value points to a different client other than the calling one, you
must also grant the calling client permission to exchange to the target client specific in the audience parameter. How
to do this is discussed earlier in this section.
Making the request
The subject_token_type must either be urn:ietf:params:oauth:token-type:access_token or urn:ietf:params:oauth:token-type:jwt.
If the type is urn:ietf:params:oauth:token-type:access_token you specify the subject_issuer parameter and it must be the
alias of the configured identity provider. If the type is urn:ietf:params:oauth:token-type:jwt, the provider will be matched via
the iss (issuer) claim within the JWT which must be the alias of the provider, or a registered issuer within the provider’s configuration.
For validation, if the token is an access token, the provider’s user info service will be invoked to validate the token. A successful call will mean that the access token is valid. If the subject token is a JWT and if the provider has signature validation enabled, that will be attempted, otherwise, it will default to also invoking on the user info service to validate the token.
By default, the internal token minted will use the calling client to determine what’s in the token using the protocol
mappers defined for the calling client. Alternatively, you can specify a different target client using the audience
parameter.
curl -X POST \
    -d "client_id=starting-client" \
    -d "client_secret=the client secret" \
    --data-urlencode "grant_type=urn:ietf:params:oauth:grant-type:token-exchange" \
    -d "subject_token=...." \
    -d "subject_issuer=myOidcProvider" \
    --data-urlencode "subject_token_type=urn:ietf:params:oauth:token-type:access_token" \
    -d "audience=target-client" \
    http://localhost:8080/realms/myrealm/protocol/openid-connect/token
If your requested_token_type parameter
is a refresh token type, then the response will contain both an access token, refresh token, and expiration. Here’s
an example JSON response you get back from this call.
{
   "access_token" : "....",
   "refresh_token" : "....",
   "expires_in" : 3600
}
Impersonation
For internal and external token exchanges, the client can request on behalf of a user to impersonate a different user. For example, you may have an admin application that needs to impersonate a user so that a support engineer can debug a problem.
| The impersonation scenario mentioned here is different from the impersonation concept of the token exchange specification. The specification does not support impersonating the token subject to different subject. The specification semantics rather means "impersonating the client" instead of "impersonating the user". |
Granting permission for the exchange
The user that the subject token represents must have permission to impersonate other users. See the Server Administration Guide on how to enable this permission. It can be done through a role or through fine grain admin permissions.
Making the request
Make the request as described in other chapters except additionally specify the requested_subject parameter. The
value of this parameter must be a username or user id.
curl -X POST \
    -d "client_id=starting-client" \
    -d "client_secret=the client secret" \
    --data-urlencode "grant_type=urn:ietf:params:oauth:grant-type:token-exchange" \
    -d "subject_token=...." \
    --data-urlencode "requested_token_type=urn:ietf:params:oauth:token-type:access_token" \
    -d "audience=target-client" \
    -d "requested_subject=wburke" \
    http://localhost:8080/realms/myrealm/protocol/openid-connect/token
Direct Naked Impersonation
You can make an internal token exchange request without providing a subject_token. This is called a direct
naked impersonation because it places a lot of trust in a client as that client can impersonate any user in the realm.
You might need this to bridge for applications where it is impossible to obtain a subject token to exchange. For example,
you may be integrating a legacy application that performs login directly with LDAP. In that case, the legacy app
is able to authenticate users itself, but not able to obtain a token.
| It is very risky to enable direct naked impersonation for a client. If the client’s credentials are ever stolen, that client can impersonate any user in the system. |
Granting permission for the exchange
If the audience parameter is provided, then the calling client must have permission to exchange to the client. How
to set this up is discussed earlier in this chapter.
Additionally, the calling client must be granted permission to impersonate users.
Procedure
-
Click Users in the menu.
-
Click the Permissions tab.
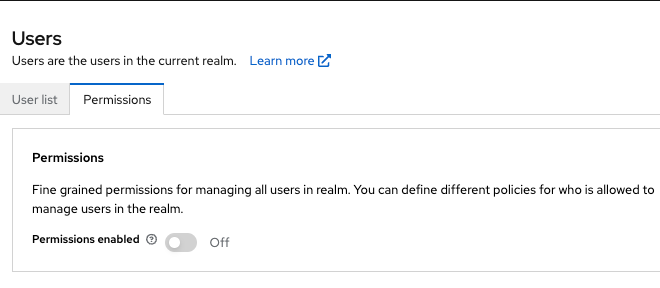 Figure 14. User Permissions
 -
Toggle Permissions Enabled to On.
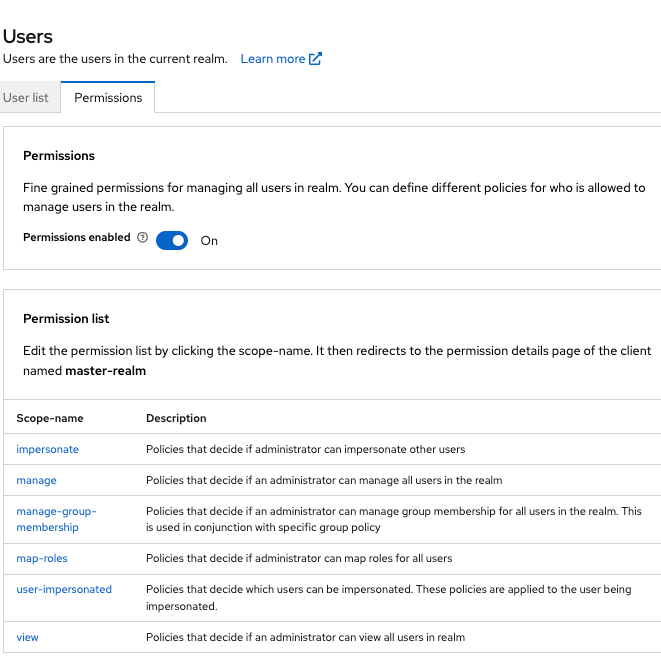 Figure 15. Identity Provider Permission
The page displays an impersonate link.
-
Click that link to start defining the permission.
This setup page displays.
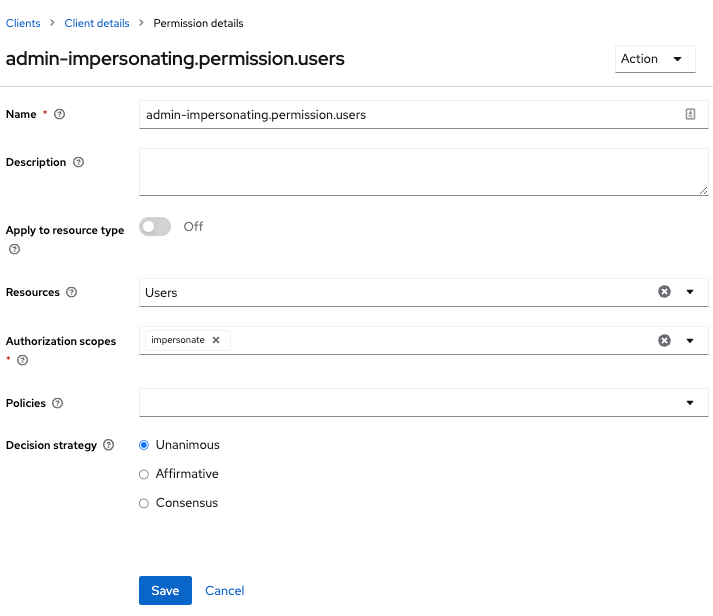 Figure 16. Users Impersonation Permission Setup
 -
Click Client details in the breadcrumbs at the top of the screen.
-
Define a policy for this permission.
-
Go to the Policies tab and create a client policy.
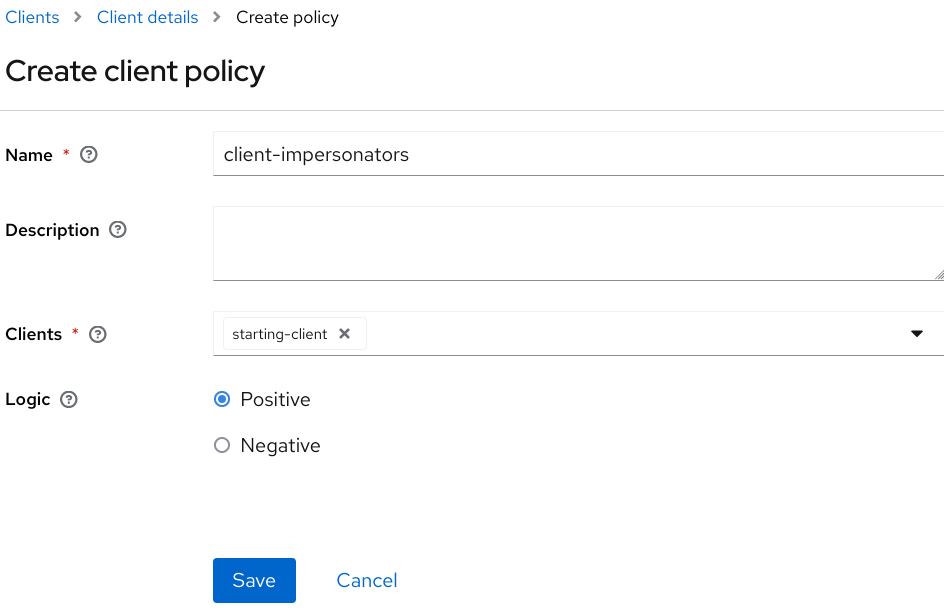 Figure 17. Client Policy Creation
 -
Enter the starting client that is the authenticated client that is requesting a token exchange.
-
Return to the users' impersonation permission and add the client policy you just defined.
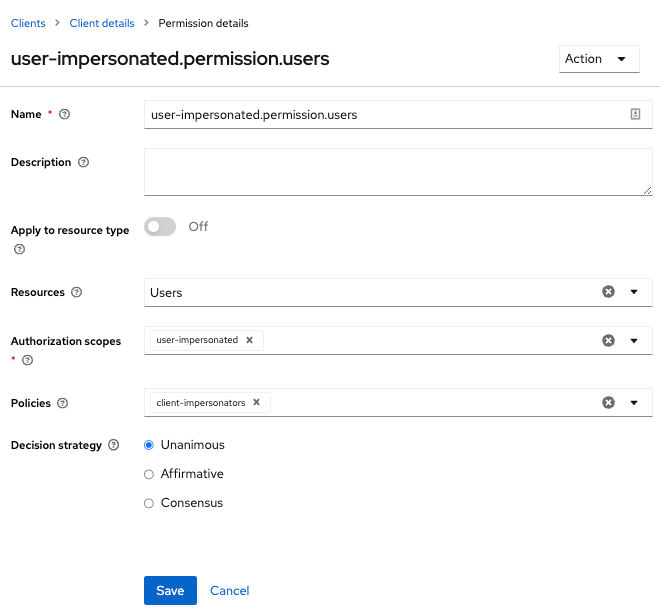 Figure 18. Apply Client Policy
Your client now has permission to impersonate users. If you do not do this correctly, you will get a 403 Forbidden response if you try to make this type of exchange.
| Public clients are not allowed to do direct naked impersonations. |
Making the request
To make the request, simply specify the requested_subject parameter. This must be the username or user id of
a valid user. You can also specify an audience parameter if you wish.
curl -X POST \
    -d "client_id=starting-client" \
    -d "client_secret=the client secret" \
    --data-urlencode "grant_type=urn:ietf:params:oauth:grant-type:token-exchange" \
    -d "requested_subject=wburke" \
    http://localhost:8080/realms/myrealm/protocol/openid-connect/token
Expand permission model with service accounts
When granting clients permission to exchange, you don’t necessarily manually enable those permissions for each and every client.
If the client has a service account associated with it, you can use a role to group permissions together and assign exchange permissions
by assigning a role to the client’s service account. For example, you might define a naked-exchange role and any service account that has that
role can do a naked exchange.
Exchange vulnerabilities
When you start allowing token exchanges, there are various things you have to both be aware of and careful of.
The first is public clients. Public clients do not have or require a client credential in order to perform an exchange. Anybody that has a valid token will be able to impersonate the public client and perform the exchanges that public client is allowed to perform. If there are any untrustworthy clients that are managed by your realm, public clients may open up vulnerabilities in your permission models. This is why direct naked exchanges do not allow public clients and will abort with an error if the calling client is public.
It is possible to exchange social tokens provided by Facebook, Google, etc. for a realm token. Be careful and vigilante on what the exchange token is allowed to do as it’s not hard to create fake accounts on these social websites. Use default roles, groups, and identity provider mappers to control what attributes and roles are assigned to the external social user.
Direct naked exchanges are quite dangerous. You are putting a lot of trust in the calling client that it will never leak out its client credentials. If those credentials are leaked, then the thief can impersonate anybody in your system. This is in direct contrast to confidential clients that have existing tokens. You have two factors of authentication, the access token and the client credentials, and you’re only dealing with one user. So use direct naked exchanges sparingly.
On this page